DIY Rain Barrels: Simple Solutions for Sustainable Watering
As the world becomes more conscious of its environmental footprint, sustainable living practices are gaining popularity. One such practice that is both eco-friendly and cost-effective is rainwater harvesting. By collecting and reusing rainwater, homeowners can conserve potable water while reducing their water bills. One of the easiest and most efficient ways to start this practice is through DIY rain barrels. These simple devices allow you to capture rainwater from your roof, store it, and then use it to water your garden, lawn, or even wash your car.
Building your own rain barrel can be a fun and rewarding project. Not only will it help you contribute to environmental sustainability, but it also provides a practical solution for your outdoor watering needs. In this article, we will discuss the benefits of DIY rain barrels, the materials you’ll need, the installation process, and how to use them effectively for a greener lifestyle.
Why Choose DIY Rain Barrels?
Installing a DIY rain barrel is an excellent way to collect and store rainwater for future use. Here are some key reasons why DIY rain barrels are a great addition to your home:
1. Water Conservation
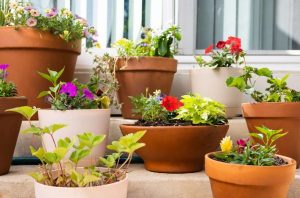
Watering your garden, lawn, or outdoor plants typically consumes a significant portion of household water. By capturing rainwater, you reduce your dependence on municipal water supplies, which helps conserve precious freshwater resources. Rainwater is free, abundant, and ideal for plants, as it’s naturally soft and often contains fewer chemicals than tap water.
2. Cost Savings
By using rainwater for irrigation, you can significantly reduce your water bill. In many regions, the cost of water is rising, and cutting down on your water usage can provide considerable savings over time. Investing in a DIY rain barrel is a relatively low-cost way to start saving on your water bill and becoming more self-sufficient.
3. Environmental Impact
Rainwater harvesting reduces the strain on local water systems and lowers the demand for treated municipal water. Additionally, capturing rainwater can prevent stormwater runoff, which often carries pollutants and debris into local waterways. Using rainwater for irrigation helps improve soil health, as it’s free of the salts and chemicals found in tap water.
4. Reduced Flooding and Erosion
When rainwater falls directly on your property, it can run off into the streets, gutters, and storm drains, contributing to flooding and erosion. By collecting rainwater in a barrel, you reduce runoff and prevent water from flooding your yard. The water you capture can be used gradually, allowing for better absorption into the ground and reducing soil erosion.
Materials Needed for DIY Rain Barrels
Building a DIY rain barrel doesn’t require a lot of specialized tools or expensive materials. Here’s a list of the basic items you’ll need to create your own rainwater collection system:
1. Rain Barrel
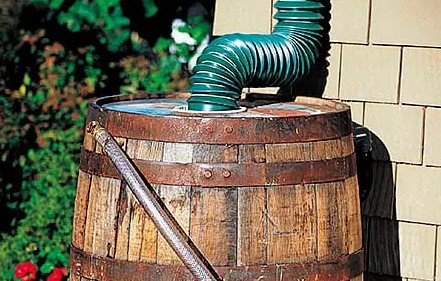
You can either purchase a ready-made barrel or repurpose a large plastic container, such as a food-grade drum or even an old wine barrel. The barrel should have a lid or cover to prevent debris from entering and to keep mosquitoes from breeding. It should also be large enough to collect a decent amount of rainwater—typically, a 55-gallon barrel is sufficient for most home gardens.
2. Downspout Diverter
To guide rainwater from your roof into the barrel, you’ll need a downspout diverter. This device redirects the water that falls on your roof directly into the barrel. You can buy a pre-made diverter or make your own by cutting the downspout and attaching a flexible hose to direct the water flow into the barrel.
3. Spigot or Tap
You’ll need a spigot or faucet near the bottom of your rain barrel to allow you to access the stored water easily. A simple garden tap will work, and it’s essential to ensure that it’s positioned at a low enough point to allow gravity to do most of the work when dispensing the water.
4. Screen or Mesh Cover
To prevent debris, leaves, and insects from contaminating your rain barrel, cover the top with a fine mesh screen. You can use a screen from an old window or purchase a specialized cover designed for rain barrels. This will also help prevent mosquitoes from laying eggs in the stagnant water.
5. Plumbing Sealant
When installing the spigot and diverter, use a waterproof sealant or plumber’s tape to ensure that the connections are secure and leak-free. This will prevent any water from escaping, making your rain barrel more efficient.
6. Drill and Saw
A power drill is essential for making holes in your barrel for the spigot and the diverter. You may also need a saw to modify the downspout or to cut any extra pieces to fit your setup.
Installing Your DIY Rain Barrel
Once you’ve gathered your materials, installing your DIY rain barrel is a straightforward process. Here’s a step-by-step guide to help you with the installation:
1. Choose a Location
Select a spot near a downspout that can easily direct water into your rain barrel. The location should be level and stable to prevent tipping. Ideally, the barrel should be placed on a platform or stand to elevate it slightly, making it easier to access the spigot.
2. Prepare the Downspout
If you’re using a diverter, cut your downspout at the desired height and attach the diverter to the cut end. The diverter should align with the barrel’s opening so that water flows directly into it. If you’re not using a diverter, simply redirect the downspout with a flexible hose into the top of the barrel.
3. Install the Spigot
Drill a hole near the bottom of your rain barrel, making sure that it’s low enough for water to flow freely out when you open the spigot. Attach the spigot or faucet using plumbing sealant or tape to ensure a secure, leak-proof fit.
4. Add the Screen
Place a fine mesh screen or cover over the top of the barrel to keep debris and insects out. This will also help prevent clogging of the spigot and ensure that the water stays clean for your plants.
5. Test the System
Once everything is installed, test the system by running water through the diverter and into the barrel. Check for leaks around the spigot and the diverter to make sure everything is sealed correctly. If there are any issues, adjust the fittings as needed.
How to Use Your DIY Rain Barrel Effectively
Once your DIY rain barrel is up and running, it’s time to use it. Here are a few tips for getting the most out of your rainwater harvesting system:
1. Watering Your Garden
Use the collected rainwater to water your garden, lawn, or plants. It’s a great way to give your plants the nutrients they need without relying on treated tap water. If you’re using a hose to water your plants, you may need a hose adapter to connect it to your rain barrel.
2. Monitor Water Levels
During dry spells, you may find that the water in your barrel runs out quickly. Make sure to keep an eye on your rain barrel’s water levels, and consider adding more barrels if you need extra storage for a larger garden.
3. Maintain the System
To ensure your DIY rain barrel continues to function effectively, clean the barrel periodically to remove any accumulated debris. Also, check the downspout diverter and spigot for blockages and ensure that the mesh screen is intact.
In conclusion, DIY rain barrels offer a simple, sustainable solution for homeowners looking to conserve water and reduce their environmental impact. By capturing and reusing rainwater, you can save money on your water bills, reduce your carbon footprint, and help protect local water sources. Whether you’re an avid gardener or simply looking for a way to be more environmentally responsible, installing a rain barrel is an easy and rewarding DIY project that benefits both you and the planet. So, why wait? Start your rainwater harvesting journey today and enjoy the long-term benefits of a more sustainable lifestyle.